一、数据分析
1 实现数据仓库(在hadoop101上)


1) 创建jobdata数据库
# cd $HIVE_HOME
# bin/hive
hive>create database jobdata;
hive>use jobdata;
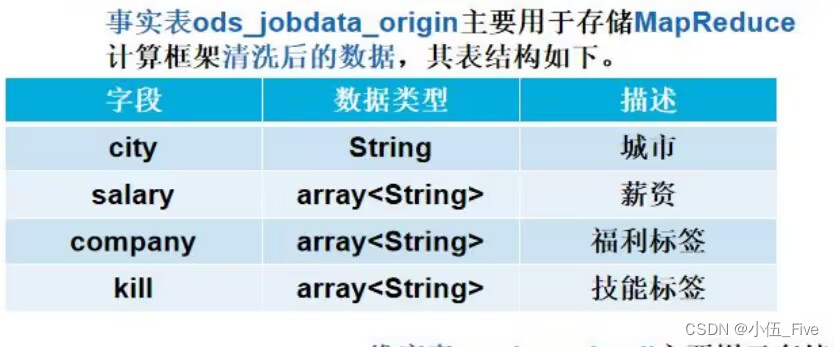
2) 创建原始职位数据事实表ods_jobdata_orgin(在hadoop101上)
create table ods_jobdata_origin(
city string COMMENT '城市',
salary array<String> COMMENT '薪资',
company array<String> COMMENT '福利',
kill array<String> COMMENT '技能')
COMMENT '原始职位数据表'
ROW FORMAT DELIMITED
FIELDS TERMINATED BY ','
COLLECTION ITEMS TERMINATED BY '-'
STORED AS TEXTFILE;
3) 将HDFS上预处理的数据导入到ods_jobdata_orgin(在hadoop101上)
hive>load data inpath '/JobData/output/part-r-00000' overwrite into table ods_jobdata_origin ;

hive>select * from ods_jobdata_origin;
4) 创建职位数据明细表 ods_jobdata_detail(在hadoop101上)
hive>create table ods_jobdata_detail(
			city string COMMENT '城市',
			salary array<String> COMMENT '薪资',
			company array<String> COMMENT '福利',
			kill array<String> COMMENT '技能',
			low_salary int COMMENT '低薪资',
			high_salary int COMMENT '高薪资',
			avg_salary double COMMENT '平均薪资')
			COMMENT '职位数据明细表'
			ROW FORMAT DELIMITED
			FIELDS TERMINATED BY ','
			STORED AS TEXTFILE;
5) 向职位数据明细表导入数据
hive>insert overwrite table ods_jobdata_detail
				select
				city,salary,company,kill,salary[0],salary[1],(
				salary[0]+salary[1])/2
				from ods_jobdata_origin;
6) 创建临时表t_ods_tmp_salary(在hadoop101上)
hive>create table t_ods_tmp_salary as
				select explode(ojo.salary) from
				ods_jobdata_origin ojo;
7) 创建工资处理表 t_ods_tmp_salary_dist(在hadoop101上)
hive>create table t_ods_tmp_salary_dist as
				select case when col>=0 and col<=5 then '0-5'
				when col>=6 and col<=10 then '6-10'
				when col>=11 and col<=15 then '11-15'
				when col>=16 and col<=20 then '16-20'
				when col>=21 and col<=25 then '21-25'
				when col>=26 and col<=30 then '26-30'
				when col>=31 and col<=35 then '31-35'
				when col>=36 and col<=40 then '36-40'
				when col>=41 and col<=45 then '41-45'
				when col>=46 and col<=50 then '46-50'
				when col>=51 and col<=55 then '51-55'
				when col>=56 and col<=60 then '56-60'
				when col>=61 and col<=65 then '61-65'
				when col>=66 and col<=70 then '66-70'
				when col>=71 and col<=75 then '71-75'
				when col>=76 and col<=80 then '76-80'
				when col>=81 and col<=85 then '81-85'
				when col>=86 and col<=90 then '86-90'
				when col>=91 and col<=95 then '91-95'
				when col>=96 and col<=100 then '96-100'
				when col>=101 then '>101' end from
				t_ods_tmp_salary;
8) 创建福利标签临时表t_ods_tmp_company(在hadoop101上)
hive>create table t_ods_tmp_company as
			select explode(ojo.company)
			from ods_jobdata_origin ojo;
9) 创建技能标签临时表t_ods_tmp_kill(在hadoop101上)
hive>create table t_ods_tmp_kill as
select explode(ojo.kill)
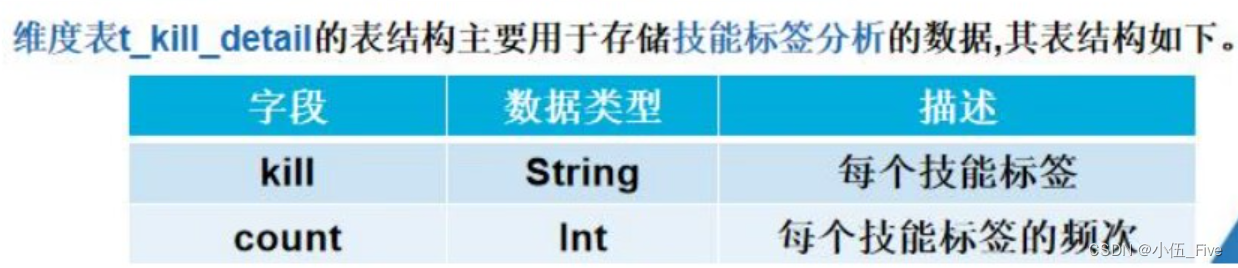
from ods_jobdata_origin ojo;10) 创建技能维度表t_ods_kill(在hadoop101上)
hive>create table t_ods_kill(
			every_kill String comment '技能标签',
			count int comment '词频')
			COMMENT '技能标签词频统计'
			ROW FORMAT DELIMITED
			fields terminated by ','
			STORED AS TEXTFILE;
11)创建福利维度表t_ods_company(在hadoop101上)
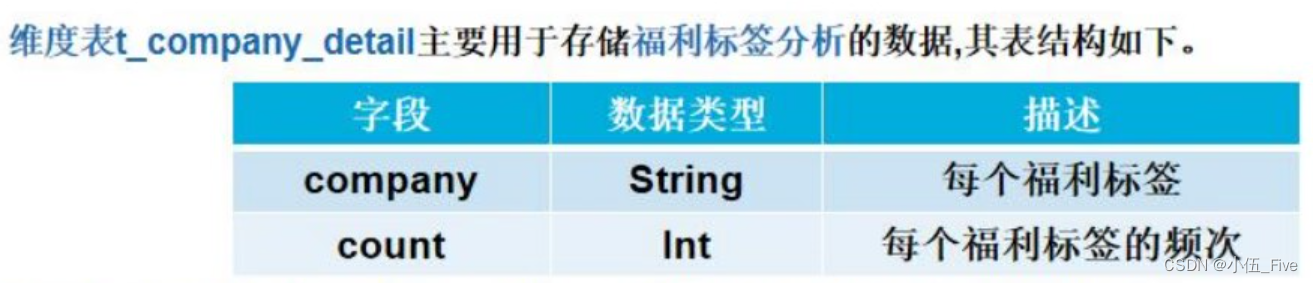
hive>create table t_ods_company(
			every_company String comment '福利标签',
			count int comment '词频')
			COMMENT '福利标签词频统计'
			ROW FORMAT DELIMITED
			fields terminated by ','
			STORED AS TEXTFILE;
12)创建城市维度表t_ods_city(在hadoop101上)
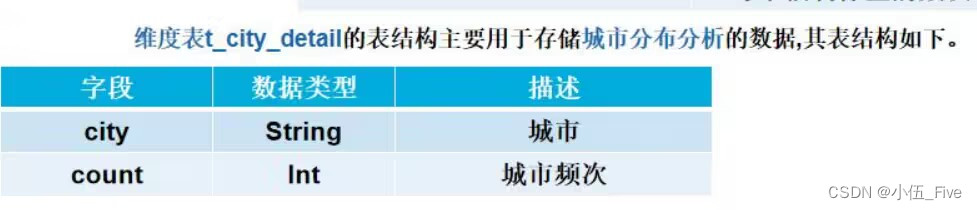
hive>create table t_ods_city(
			every_city String comment '城市',
			count int comment '词频')
			COMMENT '城市统计'
			ROW FORMAT DELIMITED
			fields terminated by ','
			STORED AS TEXTFILE;
13) 职位区域分析
hive>insert overwrite table t_ods_city
			select city,count(1)
			from ods_jobdata_origin group by city;

hive>select *  from t_ods_city sort by count desc;
14) 创建薪资维度表
hive>create table t_ods_salary(
			every_partition String comment '薪资分布',
			count int comment '聚合统计')
			COMMENT '薪资分布聚合统计'
			ROW FORMAT DELIMITED
			fields terminated by ','
			STORED AS TEXTFILE;
15) 职位薪资分析(全国薪资分布情况)
hive>insert overwrite table t_ods_salary
			select `_c0`,count(1)
			from t_ods_tmp_salary_dist group by `_c0`;

hive>select * from t_ods_salary sort by count desc;
16) 职位薪资分析(薪资的平均值、中位数和众数)
hive>select avg(avg_salary) from ods_jobdata_detail;

hive>select avg_salary,count(1) as cnt from ods_jobdata_detail group by avg_salary order by cnt desc limit 1;

hive>select percentile(cast(avg_salary as BIGINT),0.5) from ods_jobdata_detail;
17) 职位薪资分析(各城市平均薪资待遇)
hive>select city,count(city),round(avg(avg_salary),2) as cnt
				from ods_jobdata_detail
				group by city order by cnt desc;
18) 公司福利分析
hive>insert overwrite table t_ods_company
select col,count(1)
from t_ods_tmp_company group by col;
hive>select every_company,count
from t_ods_company
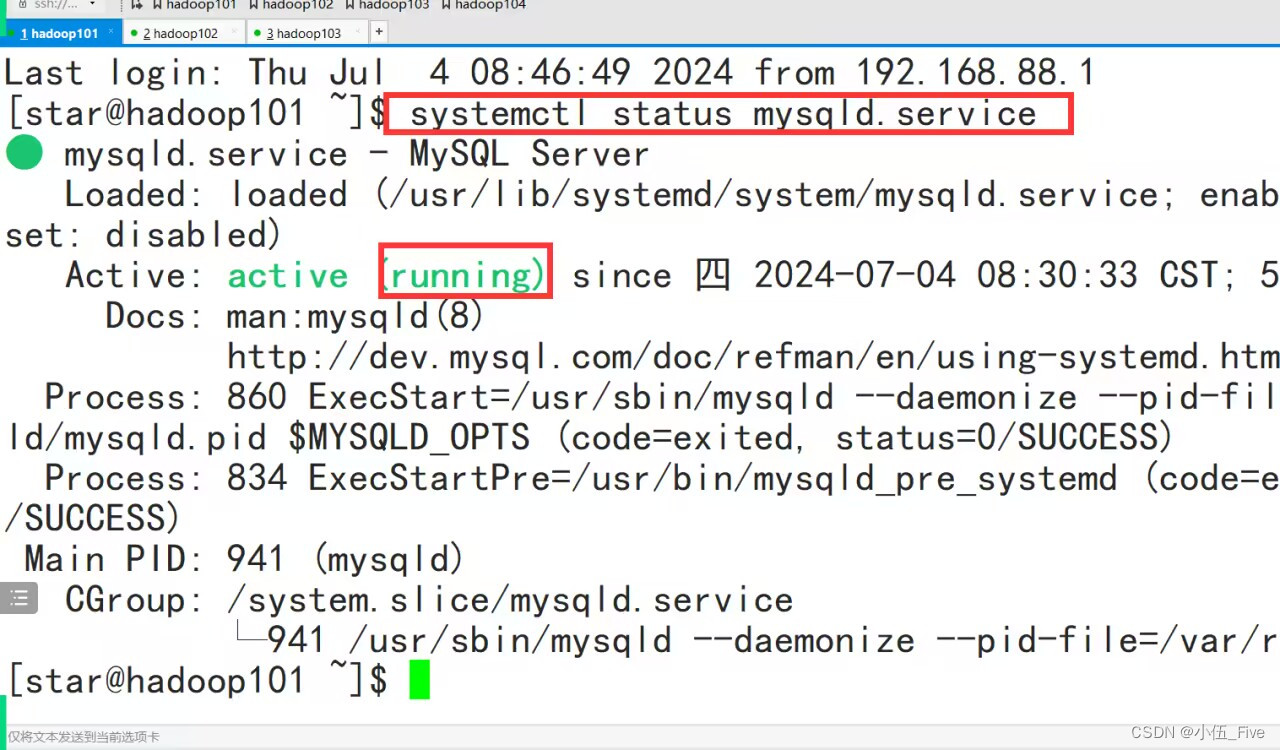
sort by count desc limit 10;systemctl status mysqld.service 查看状态
二、连接navicat

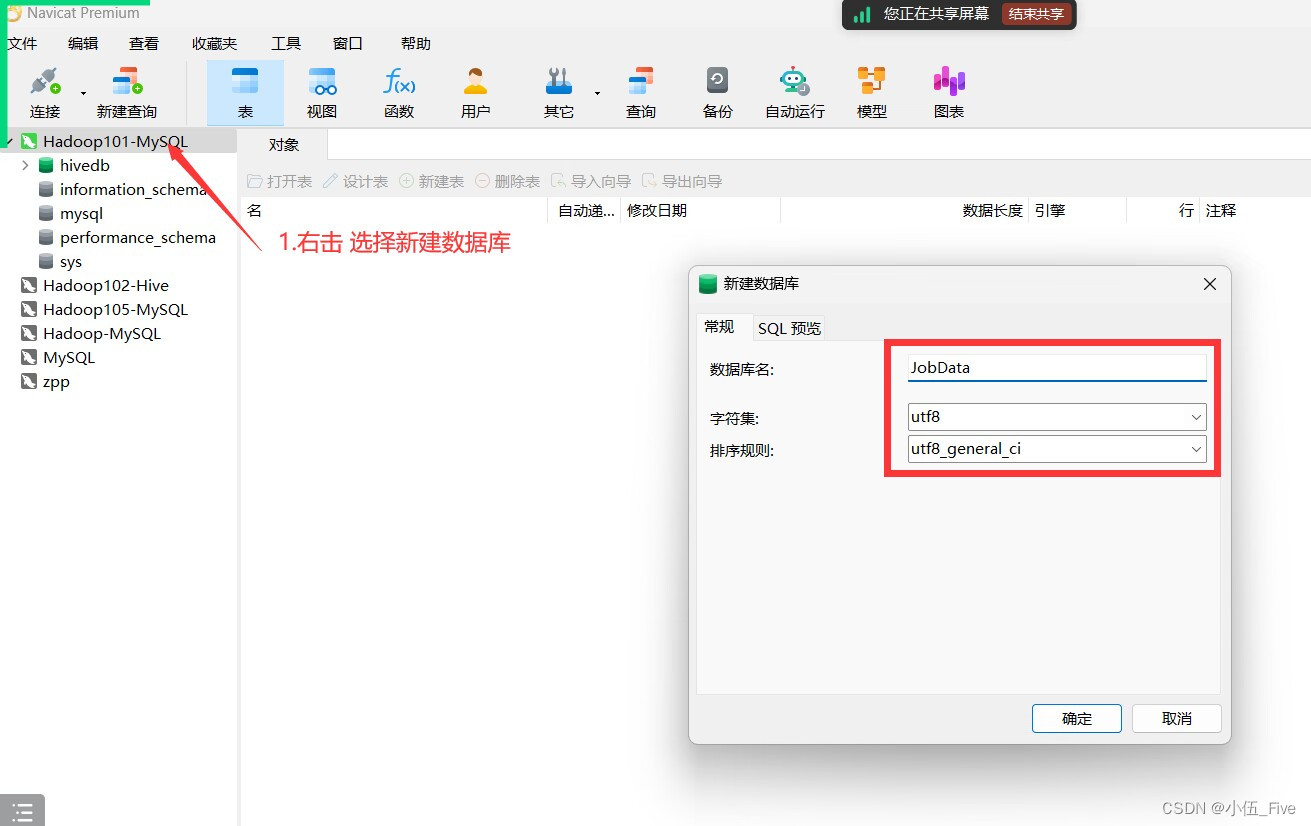
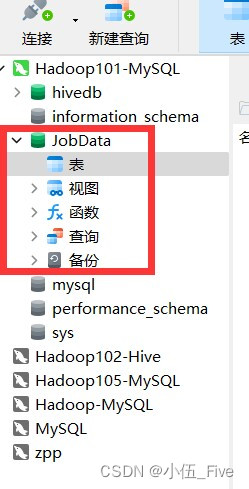

1.建表
create table t_city_count(
city varchar(30) DEFAULT NULL,
count int(5) DEFAULT NULL)
ENGINE=InnoDB DEFAULT CHARSET=utf8;
create table t_salary_dist(
salary varchar(30) DEFAULT NULL,
count int(5) DEFAULT NULL)
ENGINE=InnoDB DEFAULT CHARSET=utf8;create table t_company_count(
company varchar(30) DEFAULT NULL,
count int(5) DEFAULT NULL)
ENGINE=InnoDB DEFAULT CHARSET=utf8;create table t_kill_count(
kills varchar(30) DEFAULT NULL,
count int(5) DEFAULT NULL)
ENGINE=InnoDB DEFAULT CHARSET=utf8;2.启动sqoop传输文件,把hive数据库传输到mysql数据库
bin/sqoop export \
--connect jdbc:mysql://hadoop101:3306/JobData?characterEncoding=UTF-8 \
--username root \
--password 123456 \
--table t_city_count \
--columns "city,count" \
--fields-terminated-by ',' \
--export-dir /user/hive/warehouse/jobdata.db/t_ods_city;
在这个目录下执行上面的命令


bin/sqoop export \
--connect jdbc:mysql://hadoop101:3306/JobData?characterEncoding=UTF-8 \
--username root \
--password 123456 \
--table t_salary_dist \
--columns "salary,count" \
--fields-terminated-by ',' \
--export-dir /user/hive/warehouse/jobdata.db/t_ods_salary;
bin/sqoop export \
--connect jdbc:mysql://hadoop101:3306/JobData?characterEncoding=UTF-8 \
--username root \
--password 123456 \
--table t_company_count \
--columns "company,count" \
--fields-terminated-by ',' \
--export-dir /user/hive/warehouse/jobdata.db/t_ods_company;

bin/sqoop export \
--connect jdbc:mysql://hadoop101:3306/JobData?characterEncoding=UTF-8 \
--username root \
--password 123456 \
--table t_kill_count \
--columns "kills,count" \
--fields-terminated-by ',' \
--export-dir /user/hive/warehouse/jobdata.db/t_ods_kill;


3.添加依赖
pom.xml添加内容
<dependencies>
    <!--1.阿里云json处理jar包-->
    <dependency>
      <groupId>org.codehaus.jettison</groupId>
      <artifactId>jettison</artifactId>
      <version>1.5.4</version>
    </dependency>

    <!--2.spring-context-->
    <dependency>
      <groupId>org.springframework</groupId>
      <artifactId>spring-context</artifactId>
      <version>5.2.5.RELEASE</version>
    </dependency>

    <!--3.spring-beans-->
    <dependency>
      <groupId>org.springframework</groupId>
      <artifactId>spring-beans</artifactId>
      <version>5.2.5.RELEASE</version>
    </dependency>

    <!--4.spring-webmvc 网站设计-->
    <dependency>
      <groupId>org.springframework</groupId>
      <artifactId>spring-webmvc</artifactId>
      <version>5.2.5.RELEASE</version>
    </dependency>

    <!--5.spring-jdbc连接数据库-->
    <dependency>
      <groupId>org.springframework</groupId>
      <artifactId>spring-jdbc</artifactId>
      <version>5.2.5.RELEASE</version>
    </dependency>

    <!--6.spring-aspects是AOP切面编程-->
    <dependency>
      <groupId>org.springframework</groupId>
      <artifactId>spring-aspects</artifactId>
      <version>5.2.5.RELEASE</version>
    </dependency>

    <!--7.spring-jms异步消息通信-->
    <dependency>
      <groupId>org.springframework</groupId>
      <artifactId>spring-jms</artifactId>
      <version>5.2.5.RELEASE</version>
    </dependency>

    <!--8.spring-context-support框架扩展模块-->
    <dependency>
      <groupId>org.springframework</groupId>
      <artifactId>spring-context-support</artifactId>
      <version>5.2.5.RELEASE</version>
    </dependency>

    <!--9.mybatis框架-->
    <dependency>
      <groupId>org.mybatis</groupId>
      <artifactId>mybatis</artifactId>
      <version>3.5.1</version>
    </dependency>


    <!--10.mybatis-spring-->
    <dependency>
      <groupId>org.mybatis</groupId>
      <artifactId>mybatis-spring</artifactId>
      <version>1.3.1</version>
    </dependency>

    <!--11.mybatis分页插件-->
    <dependency>
      <groupId>com.github.miemiedev</groupId>
      <artifactId>mybatis-paginator</artifactId>
      <version>1.2.15</version>
    </dependency>

    <!--12.mysql驱动模块-->
    <dependency>
      <groupId>mysql</groupId>
      <artifactId>mysql-connector-java</artifactId>
      <version>5.1.9</version>
    </dependency>

    <!--13.阿里巴巴数据库连接池-->
    <dependency>
      <groupId>com.alibaba</groupId>
      <artifactId>druid</artifactId>
      <version>1.2.16</version>
      <exclusions>
        <exclusion>
          <groupId>com.alibaba</groupId>
          <artifactId>jconsole</artifactId>
        </exclusion>
        <exclusion>
          <groupId>com.alibaba</groupId>
          <artifactId>tools</artifactId>
        </exclusion>
      </exclusions>
    </dependency>

    <!--14.jsp的标准标签库-->
    <dependency>
      <groupId>javax.servlet</groupId>
      <artifactId>jstl</artifactId>
      <version>1.2</version>
    </dependency>

    <!--15.servlet的标准API-->
    <dependency>
      <groupId>javax.servlet</groupId>
      <artifactId>servlet-api</artifactId>
      <version>2.5</version>
    </dependency>

    <!--16.jsp的标准API-->
    <dependency>
      <groupId>javax.servlet.jsp</groupId>
      <artifactId>jsp-api</artifactId>
      <version>2.1</version>
    </dependency>

    <!--17.测试包-->
    <dependency>
      <groupId>junit</groupId>
      <artifactId>junit</artifactId>
      <version>4.12</version>
      <scope>test</scope>
    </dependency>
    <!--18.处理JSON数据类型-->
    <dependency>
      <groupId>com.fasterxml.jackson.core</groupId>
      <artifactId>jackson-databind</artifactId>
      <version>2.10.1</version>
    </dependency>

    <!--19.面向切面编程的功能模块-->
    <dependency>
      <groupId>org.aspectj</groupId>
      <artifactId>aspectjweaver</artifactId>
      <version>1.9.22</version>
    </dependency>
  </dependencies>
<build>
<finalName>JobData-Web</finalName>
<!--资源搜索设置-->
<resources>
<!--1.搜索java文件夹中类型-->
<resource>
<directory>src/main/java</directory>
<includes>
<include>**/*.properties</include>
<include>**/*.xml</include>
</includes>
<filtering>false</filtering>
</resource>
<!--2.搜索resources文件夹的类型-->
<resource>
<directory>src/main/resources</directory>
<includes>
<include>**/*.properties</include>
<include>**/*.xml</include>
</includes>
</resource>
</resources>
<!--插件管理-->
<plugins>
<plugin>
<groupId>org.apache.maven.plugins</groupId>
<artifactId>maven-compiler-plugin</artifactId>
<version>3.1</version>
<configuration>
<source>1.8</source>
<target>1.8</target>
<encoding>UTF-8</encoding>
</configuration>
</plugin>
</plugins>
</build>
4.db.properties添加内容

jdbc.driver=com.mysql.jdbc.Driver
jdbc.url=jdbc:mysql://hadoop101:3306/JobData?characterEncoding=utf8
jdbc.username=root
jdbc.password=123456


5.echarts-view.js添加内容


6.下载tomcata
将其放在根盘符下,解压缩tomcat到其目录E:\apache-tomcat-8.5.61


7.重启tomcat

删除上方红框内容


8.查看报错内容
org.springframework.beans.factory.UnsatisfiedDependencyException: Error creating bean with name 'cityServiceImpl': Unsatisfied dependency expressed through field 'mapper'; nested exception is org.springframework.beans.factory.NoSuchBeanDefinitionException: No qualifying bean of type 'cn.aust.mapper.CityMapper' available: expected at least 1 bean which qualifies as autowire candidate. Dependency annotations: {@org.springframework.beans.factory.annotation.Autowired(required=true)}
出现该问题解决方案

最终效果展示: